Designing a blister cavity isn’t just about matching the product’s shape – it’s about how the plastic film will form around that shape. در pharma blister packs, the cavity dimensions determine how a tablet or capsule fits and how much the film stretches. If the cavity is too tight, even a 0.3 میلی متر undersize can scuff or jam the pill. If it’s too deep for its opening, the film must stretch a lot, creating thin spots or even tears. در عمل, we start with the product’s exact size (including tolerances) and then add just enough space for reliable filling and sealing. As shown below, even small pills must sit with a tiny gap all around – no more, no less – to avoid rubbing the film.

شکل: The blister cavity must fit tablets snugly. Designers typically allow about 0.5–2 mm of clearance around the product to avoid scratching (حتی 0.3 mm too tight causes scuffs).
In this article we’ll explain how to size a blister cavity for proper product clearance, control the draw ratio (depth vs. باز کردن) of the گرمازا, and choose the right cavity depth. We’ll also cover common causes of thin spots and how to avoid them. The goal is a cavity sized around the pill (or capsule) and a forming process tuned to keep wall thickness uniform. شیرجه بزنیم.
این blister cavity is the molded pocket in the film where the drug goes. آن length and width are set by the product’s outline: essentially the maximum length and width of the pill or capsule. In practice you use the actual part dimensions (including manufacturing tolerances) and give a small margin for easy seating. Depth is the space from the bottom of the pocket to the flat edge; it must at least cover the product’s height plus a bit extra for the film and foil seal. Product shape matters: a capsule may lie on its side or end, a caplet might be oriented flat. The cavity’s shape and orientation follow the product’s shape, with appropriately rounded corners and tapered walls.
نکته کلیدی: always design the cavity around the real product, not just a nominal size. به عنوان مثال, even a difference of 0.3 mm too tight has been warned to scuff tablets. We must ensure enough space so the pills don’t rub, but not so much that they float or shift.
Design tips:
No strict “formula” exists here – it’s fundamentally about fit and function. But as a rule of thumb, start with the product’s dimensions plus a fraction of a millimeter. Later we check that clearance explicitly (بخش بعدی را ببینید).
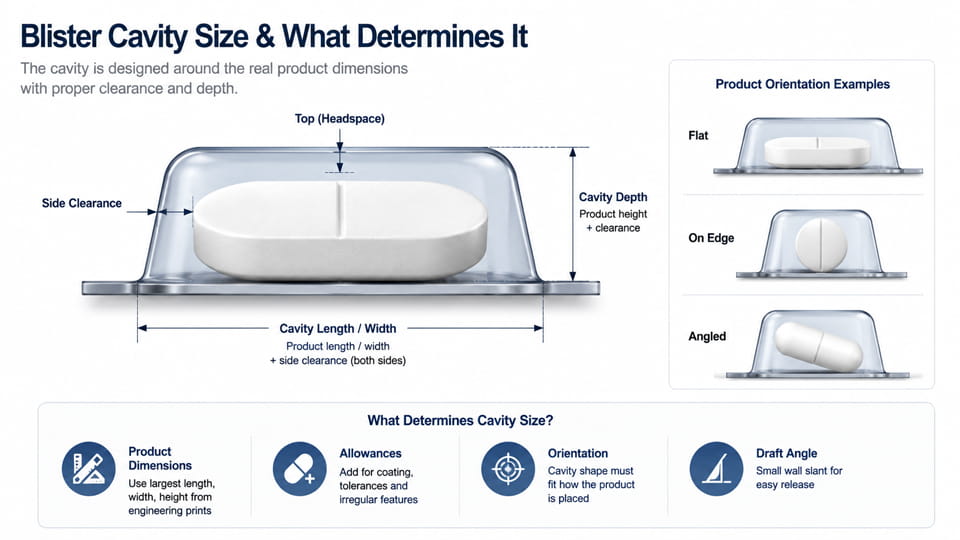
A blister cavity needs a thin gap so the product fits without force. Too little clearance can cause jams or scratches; too much leaves rattling and poor control. Industry guides typically recommend on the order of 0.5–2.0 mm total gap around a solid tablet. In practice this means about 0.25–1.0 mm on each side for a rigid, non-coated pill, و تا 1–2 mm for delicate or uneven products. به عنوان مثال, one blister design guide says “allow 1–2 mm clearance around the product”, while another suggests about 0.5–1.0 mm for rigid parts and a bit more if the part is softer.
The clearances fall into a few categories:
چرا مهم است: If clearance is too tight, tablets may wedge or scratch, and powder can settle between pill and wall, باعث تغذیه نادرست می شود. If it’s too loose, the pill can tilt or bounce, potentially breaking seals or causing orientation errors. Good designs balance these. A thermoforming consultant emphasizes that هر shortage of clearance is dangerous – a cavity only 0.3 mm too tight will scuff a product. So it’s better to err on the safe side by a few tenths of a millimeter.
خلاصه, aim for roughly 0.5–1.0 mm of empty space around a solid tablet. For very delicate tablets or those with protrusions, use up to 2 میلی متر. Always confirm with a sample: measure the product and test-fit in a mock cavity before finalizing the design.
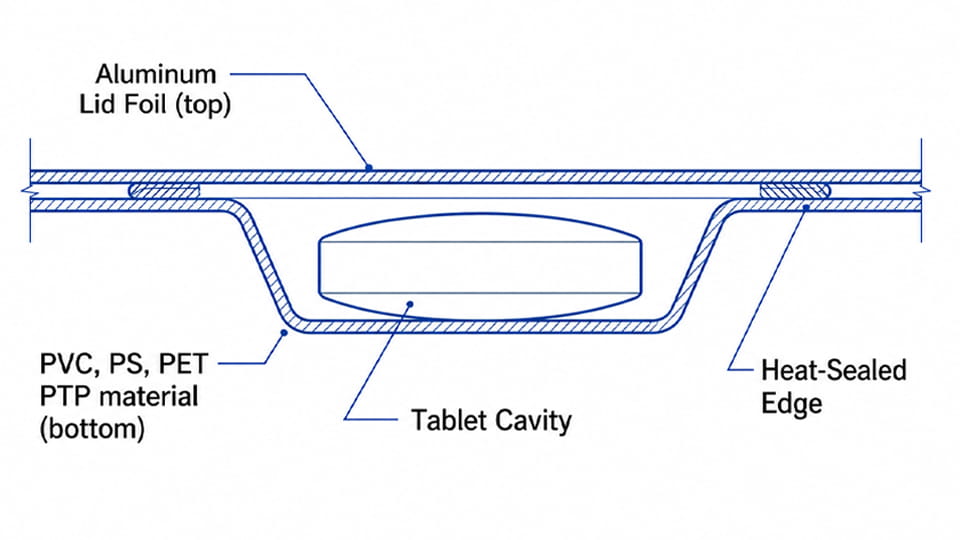
این draw ratio describes how much the plastic sheet must stretch when forming a blister pocket. There are two common definitions:
به زبان ساده: ADR tells you how much area expansion happens (and thus average thickness drop), whereas LDR focuses on depth. Both matter in blister forming. در واقع, thermoforming experts say you should check both and take the بزرگتر نسبت (highest stretch) as the key design metric. If one ratio is moderate but the other is very high, you risk severe thinning.
For pharmaceutical blisters, LDR is often a handy quick check (deep cavities are our main concern). For a rough guide: an ADR of 2 means the film area doubles, so average thickness is ~1/2 of original. اما یادت باشه, حداکثر thinning in any one spot can be much worse. The absolute thinnest point in a part can easily be ~2× thinner (یا بیشتر) than the average predicted by ADR. به عبارت دیگر, if ADR suggests average thickness is 0.5× the sheet, local hotspots might see only ~0.25×. This is why controlling geometry is crucial.
Example calculation: Suppose a blister cavity has side length 10 mm and width 10 mm at the opening, tapering to 8 mm depth. The LDR = 8/10 = 0.8. If the formed area is, بگو, 160 mm² and it was drawn from an initial 100 mm² of sheet, ADR = 1.6. The average thickness would be 1/1.6 = ~0.625× the original. But one might double that for a worst-case thin spot estimate (~0.31× original).
غذای آماده: Always be clear which draw ratio you’re using. برای تاول, we commonly use LDR (depth/width) for design rules, but ADR helps estimate overall thinning. And always design for the worst (بالاترین) value.
Cavity depth is directly tied to stretching. A deeper pocket means the film must travel farther from the plane of the sheet, stretching more. All else equal, deeper = more stretch = thinner film, especially at the bottom and corners.
Design guides warn about this explicitly. به عنوان مثال, ePack’s blister design tutorial says “overly deep cavities thin the plastic during forming, creating weak points”. That matches what we see: in a deep female mold, the plastic is pulled tightly into the bottom, often becoming thinnest at the lowest point. As Jinlupacking notes for vacuum forming, “areas of the sheet reaching the mold last are generally the thinnest”. In a deep pocket, the bottom center and sharp corners typically contact last, so they get stretched the most and become the thinnest spots.
برای نشان دادن: imagine two cavities with the same opening size, one shallow and one deep. The deep one has a much higher LDR, so its walls will stretch more. در عمل, this means corners and the bottom of the deep cavity are at risk of being too thin. Designers often combat this by either limiting depth or widening the opening.
Another factor is corner geometry. Sharp corners concentrate stress. Empirical advice from vacuum-forming experts is to use generous radii. We suggest at least 2–3 mm for internal corners to spread the load. If corners are too sharp (<1.5 mm radius), the film can tear or crack at those points. به طور خلاصه, a deep cavity with tight corners is a recipe for thin edges.
Avoid just adding film thickness. While you قوطی use a thicker sheet to handle more draw, it’s not a cure-all. A thick sheet in a very deep cavity will still produce thin corners (just “not quite as thin”). It’s better to reconsider the geometry: perhaps make the opening slightly larger, or reduce depth if possible. If extra depth is absolutely needed (for high capsules, برای مثال), then consider process changes (بخش بعدی را ببینید).
خلاصه, any increase in depth demands scrutiny. If you need more depth than standard, consult experts and test carefully: deep pockets can drastically increase draw. به عنوان یک قانون سرانگشتی, aim to keep depths moderate for the required opening, or be ready to use plug assists or special methods.
Thin spots are essentially علائم of one or more design or process issues. The usual suspects are:
Less obvious factors:
در عمل, thin spots usually occur at corners or the deepest point of the cavity. If you see thin corners, check the geometry (radius, draft) and consider a plug. If the whole wall is too thin, the draw ratio (depth vs opening) is likely too high.
Troubleshooting tip: Jinlupacking’s technical notes advise: if you encounter “dangerously thin walls”, look at heat and stretch. Solutions include “modifying cavity design” (larger opening, more draft or radii) and “adjusting plug assist” timing.
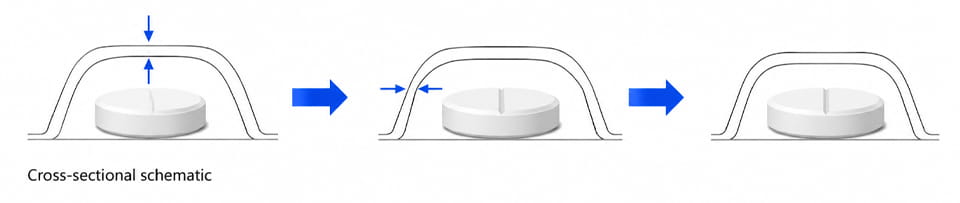
To minimize thin spots, focus first on geometry:
Now the پارامترهای فرآیند:
Key reminder: If you’re struggling with thin walls, don’t just grab a thicker sheet as the only fix. Often a geometry tweak (like filleting a corner or increasing draft) or a forming tweak (adding a plug) solves the root cause.
Once a cavity is designed, prototype and measure before mass production:
Never skip this step – issues like thin spots or poor seal are much cheaper to correct on paper or prototype than after tooling and full production.
Blister machine choice can impact cavity design, so check these key specs:
خلاصه, read the spec sheet carefully. Match هر دو the maximum pocket dimensions and the depth to your worst-case product. به عنوان مثال, if you pack a 20 mm high tablet, a machine limited to 12 mm depth won’t work – you’ll need the flat-plate option that goes deeper. Also confirm the oven length and heater power is sufficient to heat thicker films if needed.

Also factor in production considerations: does the machine’s speed and automation match your output needs? Does it handle the tablet/capsule feeder and striper you plan to use? While not cavity design per se, machine capability (به عنوان مثال. vacuum level, pressure forming option) ties back to whether your design (depth, قرعه کشی) can be realized reliably on that machine.
خلاصه, good blister cavity design starts with the product and finishes with the forming process. Ensure just enough clearance for the pill to sit securely (typically ~0.5–2 mm around it). Keep cavity depth and corner shape sensible: very deep pockets and sharp corners greatly increase stretch and produce thin walls. Always control the draw ratio (depth vs. باز کردن) to a safe level, and use supportive forming methods (draft angle, plug assist) to relieve stress. Validate everything by prototyping – measure your molds, test-form the actual film, and load real tablets.
If you need help, remember that cavity design ties into machine choice. به عنوان مثال, JinluPacking دستگاه های بسته بندی تاول come with various forming areas and depths to fit different products. Our DPP-270Max flat-plate model can handle large, حفره های عمیق (up to ~26 mm deep), while the DPH-270Max roller model suits wider, shallower packs. با ما تماس بگیرید for assistance: we can advise on the right machine and custom molds to match your tablet or capsule. With the right design and equipment, you’ll avoid thin spots and achieve consistent, robust blister packages.
The cavity size is driven by the product itself. We use the pill or capsule’s outer length, width and height to set the mold dimensions. The cavity needs to be just slightly larger than the product – big enough to hold it without contact, but not so big that the item moves around. اساسا, the product geometry (and the chosen orientation) directly determines the cavity’s footprint and depth.
Typically about 0.5–1.0 mm of clearance on each side of the tablet for a snug fit. If the tablet is delicate or irregularly shaped, use up to 1–2 mm to avoid any scratching. The goal is minimal movement: enough gap so it doesn’t jam, but not so much that it rattles or shifts.
Cavity depth is generally the tablet’s thickness plus a small allowance. There’s no one-size formula; designers usually add 1–3 mm extra beyond the product height to accommodate the film and lidding foil. Exact depth depends on material stretch and sealing requirements. در عمل, you set a target depth (product height + “headspace”) and then prototype to confirm.
The draw ratio quantifies stretch. It can mean linear draw ratio (cavity depth divided by opening width) or area draw ratio (formed area divided by original sheet area). In blister forming, LDR (depth vs opening) is often used for pockets, while ADR (area ratio) estimates average thinning. Both measure how much the sheet is stretched.
A higher draw ratio leads to thinner walls. Approximately, average thickness scales as 1/ADR (double the draw area halves the thickness). But keep in mind, local thinning can be much greater than the average. Engineers often double the average thinning to estimate the worst-case thin spot. به طور خلاصه, if your draw ratio is large, expect extremely thin areas unless design or process is adjusted.
Thin spots occur where the film is overstretched or poorly supported. Common causes include an excessive draw (too much stretch), very deep cavity pockets, گوشه های تیز, uneven heating or vacuum, and lack of plug assist. اساسا, any feature that makes the film pull farther or faster will thin it. Ensuring uniform stretch and avoiding extreme ratios helps avoid these spots.
Use design and process fixes. Geometrically, give corners generous radii (2–3 mm or more) and proper draft. Forming-wise, ensure even heating and consider a plug assist: pushing the film into the cavity first can thicken corner areas. Moderating the draw ratio (به عنوان مثال. enlarging the opening) نیز کمک می کند. به طور خلاصه, soften the corners (literally) and relieve stretch.
Plug assists are typically used when the linear draw ratio is high (deep pockets) or if ADR is high. A rule of thumb: if your pocket depth is close to or greater than its width (high LDR) and corners keep thinning, try a plug. RapidMade notes that “excessive stretch ratio” is a key reason to add a plug. در عمل, if regular vacuum forming leaves holes or thin tears, switching to plug/form-pressure forming is a good idea.
Thicker film can tolerate more stretch, but it doesn’t guarantee eliminating thin spots. A very thick sheet will still thin out if overstretched. It may just withstand it a bit more before tearing. Proper cavity design and forming technique are more effective at controlling thin areas. به عبارت دیگر, thickness is one tool (use it judiciously), but geometry and process control are key.
Prototype, prototype, prototype. Machine a mold or form a cavity and measure it. Then trial-form a sheet and measure the actual cavity dimensions and wall thickness. Fit your product samples in the formed cavity to ensure clearance is correct. Check high-risk spots (به عنوان مثال. bottom corners) with a micrometer or gauge. It’s also wise to do a pilot pack run to confirm loading and sealing. Only after these checks are you confident the design works.
مراجع:
1.Plastic primary packaging materials – راهنمای علمی —— آژانس دارویی اروپا
2.مطالعه توزیع ضخامت تاول پی وی سی طبی گرما شکل —— IOPscience
3.The role of plug design in determining wall thickness distribution in thermoforming —— کتابخانه آنلاین WILEY
4.The Effect of Plug Design on Thickness Distribution of Thermoformed Package —— Dergipark
5.Prediction of wall thickness distribution in thermoformed mouldings —— ScienceDirect
6.Standard Test Method for Leak Detection in Blister Packaging by Vacuum Deflection Method by Laser Measurement —— ASTM